Saturday, 7 April 2018

Candidate Information

Candidate Name: Abigail Baxter
Candidate Number: 4129
Centre Number: 14405

Brief: A promotional package for the release of an album, to include a music promo video, together with the following:
  • A website homepage for the band
  • A digipack for the album's release 

Wednesday, 4 April 2018

Evaluation Question 3

What have you learnt from your audience feedback?

For my target audience feedback evaluation I decided to interview some people who fit my target audience with questions about both my main product (music video) and my 2 ancillary products. I felt this was appropriate because as the Rough-Cut was very short, we hadn’t actually got any feedback from the finished video. In order to get strong feedback I asked a number of different questions ranging from what was good about my products to what could be improved.
Audience feedback was essential in the whole process – production, planning and post production. Gathering feedback at all of these stages enabled us to continuously improve our music video, ensuring that the final product would be something our audience would enjoy and  would be completed to the best of our ability.
DURING PRODUCTION
Here is the Rough-Cut Feedback I gathered during production from my classmates: 

My conclusion of which was:
  • We need to get a move on with the overall production of the music video, specially re-filming the footage that we need to and putting this footage into the sequence so it is ready to be edited.
  • Make sure there are no further continuity issues and issues with placement of the footage - need to make sure that our actors are on the same side of the screen throughout the whole video


POST PRODUCTION 

Here is the post production feedback I gathered from my target audience: 


Interview questions:

1. Did you like my music video? If so what aspects or parts of the video were your favourites? 
2. Would you watch the music video again?
3. Was there anything you didn’t like about the music video or anything you could suggest to improve it?
4. Does the music video convey the genre effectively?
5. Were aspects of my music video similar to a professional music video you would see in the industry?
6. What did you like about my digipak and what would you suggest improving?
7. What did you like about my website and what would you suggest improving? 

Conclusion

In regards to my music video some improvements that members of my target audience suggested were small things like taking the split screen line out at the beginning as the narrative hasn't actually started yet at that point in the video as well as to develop the footage using more colour. A common improvement that came up in my post production feedback was that there were particular parts in the music video that we quite slow and boring like the bits where they were walking to the bench; this time could have been used to further progress the story as well as show specifically why the girls were not friends anymore. 

In regards to my digipak I was told that I could create a spine, use more photos of the artist and development of legal information. As for the website, the music page could be developed as it all looks the same as well as the text on the tour page being difficult to read which is what some of my target audience noticed. 

From this feedback, if I had the chance to go back I would alter many of these things and make the appropriate improvements but going forward I will make sure to follow the codes and conventions of real media products (creating a spine and developing the music page) in particular. As well as providing a more in-depth narrative rather than wasting time by using footage of the characters doing the same thing. Next time I would definitely take more time developing the narrative and not only making sure I have enough footage but the appropriate footage to communicate both the genre and the narrative concept of the music video.  

Monday, 2 April 2018

Evaluation Question 1


For Evaluation Question 1, I decided to make a website which can be accessed through the following link: https://abibaxter1.wixsite.com/evaluationq1

Saturday, 31 March 2018

Development of Website

Tour Page

Today I decided to develop the 'Tour' page of my website in particular as before I hadn't edited the button to show specific dates and times regarding the artist's various performances, so I did that making sure that I included a wide range of venues (That I had researched) and changing the information regarding the times and price. 


Shop Page

Initially, I had designed clothing merchandise as a way of promoting my artist, this included t-shirts, joggers, hats etc. Towards the end of production, I had realised that I hadn't put the song and album onto the shop page - this was significant as it was the main product being advertised on the front page of the website. Following conventions of real media products, I developed this page by providing the option to buy both the album in both MP3 and CD format and the single in MP3 format. 


About Me Page

Initially the 'About Me' page had lots of information regarding the artist but no images of him. I decided that this could seem quite boring to an audience or viewer and decided to include a rather large picture of him that be seen as soon as you click onto the page in an attempt to establish a brand image. 


Sunday, 25 March 2018

Development of Digipak

Before starting the production of my digipak I decided to use this template as a rough guideline of where exactly to position everything such as my images, text etc. 


On the left are the photos I am going to use for the front cover of my digipak (uneditied):I decided to do the front cover first as it was the most important and once I'd done this I could make the others relating them directly to the front cover. So for the front cover I decided that I wanted to use the same photos of my artist that are featured on my website to ensure that I had synergy between the two and to establish the 'star image' - if I have an image or images of my artist on the front cover of the digipak it will be recognisable to the audience. Before actually placing in over the template I decided to edit the photos in Photoshop.


The first thing I did was position the images over each other to get the effect that I wanted with the second image somewhat enlarged in relation to the first photo. I did this by changing the opacity of both images making sure that you could still see both images in enough detail. Whilst editing the photos for the front cover I experimented with saturation and colour grading as I liked the look of it. I also manipulated the images using shapes specifically squares and rectangles and I did this by using the select tool to select a rectangular or square of the photo and deleting it. As it had the other photo underneath, this gave a really nice and unique effect.  This is the picture I initially was planning to use for the front cover of the digipak after editing it in Photoshop:


As you can see there were some issues with the color grading particularly around the bus in the background that I didn't like and I was finding it difficult to get rid of this. This was when I decided to make the whole image in black and white - by doing this I was avoiding the problem of the colour grading but also making a direct link between my digipak, website and music video as the music video has black and white flashbacks in it. I did this by using a black and white overlay. 

After deciding that I was happy with the image I decided to flatten it and save it as a JPEG to use on my digipak and place over the template. Once I'd imported it into Photoshop, I had to crop the image so it fit inside the space for the front cover. I did this by first positioning the photo where I wanted it within the square and then selecting anything outside the square and deleting it. 


 Obviously the front cover wouldn't be complete with just an image as this wouldn't follow the conventions of an R&B digipak. I added the album title 'WORLD//WHY' and the artist logo to make the digipak more recognisable - if the audience were familiar with the logo it would probably be the first thing they'd notice on the digipak. 

As you can see on the left, my front cover consisted of 3 layers, the main image that I'd already edited in Photoshop, the album title and the artist logo. 

Final Front Cover for the Digipak: 


Back Cover

By the time I'd gotten to my back cover, I'd decided that I would make the whole digipak black and white because just having the front cover black and white would look confusing in comparison to the other sides of the digipak. I decided to use a concert image for the back cover so to make this black and white I did the same thing (using a black and white overlay) as I did for the front cover. I decided to add a texture behind the image to make it more unique and it was in fact a texture that showed what looked like crumpled paper which looked like it had been burnt. I chose to use this texture in particular as it provided a strong link with the music video - specifically the shot at the beginning of the photo being shown next to the lighter. On the back cover I also used the text tool to create the song names, album title and legal information; ensuring that they were all in the same font. I also put the production logo on the back cover and a barcode - following the conventions of a real media products. Final Back Cover for the Digipak: 


Inside Left and Inside Right

I'd already edited both the front cover and the back cover, I wanted to keep the inside left and right as quite simple. For the inside left, I decided to use the same image evident on my front cover but with less manipulation. Rather than manipulating the image, I used another texture/image that I sourced of a geometric shape pattern. I decided to use this as it provided a strong link between my digipak and my website it places emphasis on the use of shapes. As for the inside right, I used a picture of my artist walking away with no actual editing aside from the black and white overlay with the same crumpled paper texture I used behind the concert image on my back cover. Obviously as well as this I created the circle in the middle to establish that this was the side of the digipak that would have the CD in it. 

Friday, 16 March 2018

Production Diary - 3,4 and 5


Day 3 - Today was a successful day - we started filming at around 11:30am and with the help of our friend Sara, managed to film the bits of Allanah travelling home. We planned to film the park bits today but we didn't have enough time so the footage of Allanah travelling home is all we got but it was really good quality and exactly how we wanted it to look. Today we also managed to film Allanah's shower scene which is going to go at the beginning. The corresponding footage Becky will film in her own time as we don't all need to be there. Both of these scenes will be filmed on the GoPro.

Day 4 - With the deadline for the rough cut soon approaching we wanted to get most of the remaining footage filmed today, specifically all of the park scenes so we wouldn't have to go back. This day we managed to film a lot -  all of the park scenes and even a lot of footage of Allanah and Becky travelling to the park. We also managed to film the footage that was needed after the scenes of Becky's dad shouting at her - this included her going upstairs to her room, crying on the bed, and finding the picture on the floor after throwing her books on the floor. This was a really productive day and we think we'll need to film one more time but then we should be finished. Ideally we would have wanted to shoot all the footage before editing but because of various technical problems we have had to deal with we have been editing the footage that we have as we go along. With the majority of the footage now filmed we hope to get together a decent rough cut. 

Day 5 - This was hopefully out last day of filming. After all staying after school to edit we left school at around 3:30 and went straight to Allanah's to film the remaning footage which was the scenes of her greeting her mum and then finding the picture. This was another productive day, although it was fun we hope to be finished filming now and moving our focus to editing in order to get the music video finished before the deadline. 

Thursday, 15 March 2018

Production of Logos

I decided to use Adobe Illustrator to make both my artist logo and production company logo as it was a piece of software I was already familiar with and confident in using. 

Artist Logo

For my artist logo I decided to sketch 4 rough ideas so I could get some feedback from my target audience and then choose from a range of ideas. My initial rough sketches are below:

After gathering feedback from my target audience on all four of my artist logos, I decided I would stick with my first idea because it got the most positive feedback and was the one that I liked the most. 

Making my artist logo using Adobe Illustrator:

1. Similarly to my production logo, all of these designs comprised of basic text and the crown visual meaning that it was easy to create. So firstly I used the text tool to create the separate words and then placed them in the arrangement. It was important for me to pick a font that fit my genre.

2. I used the line tool and oval tool to make the crown visual and then put it over the 'T'.

3. I also decreased the size of the crown visual and placed it onto the edge of the last 'E' of 'THRONE' so it looked like it was hanging off the actual letter.

My Final Artist Logo:


Production company logo

As I did with the artist logo, I came up with 4 production company logos before deciding which one to take forward and make in Adobe Illustrator. My initial rough sketches are below:


I decided to use and produce my second idea because I thought one of the designs with the rectangle shapes (2 or 3) would be the most suitable for putting on my digipak and possibly my website. Between the two I liked the second design more because it thought I needed to have the word 'productions' within the logo otherwise it would people may not know what HEIR means or that it is even the production logo. 

Making the production logo in Adobe Illustrator:

1. As my logo design was made up of text and shapes it was relatively easy to produce in Illustrator. But the first thing I did was create the rectangle outline using the shape tool. 

2. Secondly I used the text tool to write the production name and then I just placed this where I wanted it inside of the box. 

3. Lastly I used the line tool to make the crown, making sure to zoom in and make sure that the crown looked neat with no lines poking out. After I was happy with the appearance of it, I simply decreased the size and placed it above both of the 'i'''s of the text. With a simple line underneath the word production which I made thicker.

My Final Production Logo:


Wednesday, 14 March 2018

Screenshots of Editing Process/Editing Diary 1

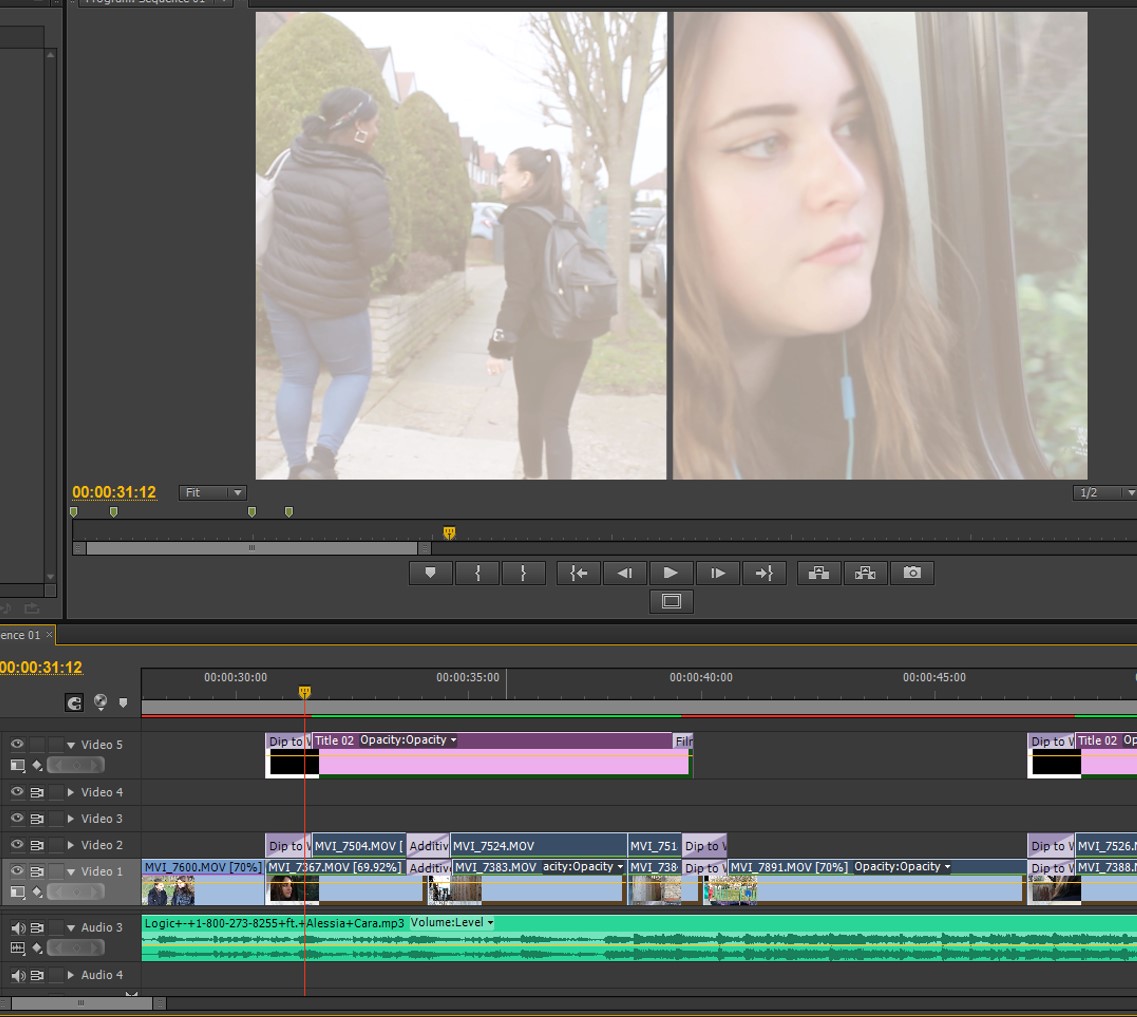
Now we have all of our footage we are able to start the editing process. Today we started importing the footage we had for the beginning of the music video specifically the shot of the lightbulbs with the production logo first which would be followed by the bath/shower shots to establish the characters early on.

Today we also put in footage of the empty bench - the importance of  which will be understood later on in the video. During this editing session we also used a range of transitions to ensure that the footage ran smoothly with good match on action and no continuity issues. By the end of this session we had a solid beginning to the music video which continued until the first flashback. In this session we also did our first bit of colour grading on all of the footage we had edited. We were also able to make the title for the split screen and alter the thickness. Having done this already will save us time in other editing sessions as all we have to do it insert the title over the footage. 


Monday, 5 March 2018

Rough-Cut Feedback

In class, we all presented a rough cut of our music videos. At the time, a lot of our footage needed to be re-filmed so we didn't bother putting this into the rough cut for two reasons; 1. We weren't happy with the quality of the footage and had bits missing and 2. We were running out of time to edit. Based on these decisions we decided to use the time wisely to ensure that what we did have which was the beginning of the music video, was good quality and looked how we wanted it. Therefore, our rough cut was very short in length but what we did establish through the beginning was the feel of the music video so the class could imagine how the video will look like when we are finished. Here was the feedback that we got:


 Here's what the other groups liked about our Rough-Cut:

- Liked the colour grading
- The footage was well edited
- Good use of GoPro
- Good continuity 
- Excellent concept
- Good range of camera angles
- Good lighting
- Use of split screen
- Great acting 
- The originality of the logo

Here are the suggested things that we could improve on:
- Add more footage
- Glow effects to give it a more surreal dreaming feel
- Issue with the placement of the footage - swapping sides at the beginning
What we need to do now:
- We need to get a move on with the overall production of the music video, specially re-filming the footage that we need to and putting this footage into the sequence so it is ready to be edited.
- Make sure there are no further continuity issues and issues with placement of the footage - need to make sure that our actors are on the same side of the screen throughout the whole video
Conclusion
This Rough-Cut feedback session was very helpful in terms of giving us things to work on. We hope to take this feedback and use it to improve the sequence we already have and finish the music video.

Friday, 2 March 2018

Production Diary - Day 1 and 2


Day 1 - Today was our first time going out to film and we decided to film the scenes of Becky travelling home. We wasted some time working out how to use the camera as we hadn't use this specific type before but after we figured it out we managed to get some really good footage. In particular we got some really good shots of Becky on the bus (both medium close ups and close ups) to show her emotions. We also managed to get good footage specifically of Becky opening her gate and going into her house. Today we tried to film some additional shots from the inside of the house rather than the outside but the lighting was quite dark and we decided that the footage didn't look of a good enough quality to use in the video so we decided to leave it at the bit where the front door closes (from the outside). Even though we didn't film a lot today, the footage that we did manage to get was of really good quality, shows various different camera angles and looked exactly the way we wanted it to (bearing in mind that it would be in slow motion with the corresponding footage of Allanah on the other side). 


Day 2 - This day started off well because we all finished early and we had all of the equipment ready. However, when we got to the park and attempted to film most of the park scenes, the camera would stop recording half way through the shot and showing a 'Card Full' error. We tried to solve the problem by deleting the footage that we didn't need but even then there still wasn't enough space and we'd only filmed a few shots. This was a big problem because after travelling all the way to the park with the equipment we weren't able to film as much as we would have liked to. As a result, this wasn't a very successful day. We managed to get some great shots but because we could only film bits of it, we decided not to use this footage to prevent inconsistencies in Allanah and Becky's costumes. Although this day wasn't very successful, we did get some great close ups which we are planning to include at the beginning of the music video. Even though they are wearing different clothes we are still going to use these close ups as we figured that their clothes won't be in the shot.

Tuesday, 28 November 2017

Treatment Feedback

Today we presented our treatment for our music video to the class and received feedback from all the other groups. As a group, we were told what the other groups liked about our music video ideas but also what we could improve on and some questions which overall was really helpful. 


Here's what the other groups liked out our music video ideas:

- They liked the idea of the split screen 
- They liked the idea of the contrast in the characters between happy and sad
- They thought our overall narrative was unique and well thought through 
- Good location planning
- Good application of theory
- Good consideration of characters and their impact upon the storyline 
- Good idea with the ending (the bench idea)
- Post-production ideas of colour grading should work well
- Good connection between song meaning and narrative idea

Here are the suggested things that we could improve on:

- It could be difficult to get a good focus on the camera if it is steamy inside the shower?
- Lip Syncing may be hard
- Come up with a plan for the lighting outside
- Think about the specific shots and editing techniques you will use
- Think about your target audience
- Consider how you will incorporate genre characteristics into the music video
- Try to have a variety of shots, not just all at home 
- Make sure you film all footage bright and colour grade into dark to prevent grain 


Questions we were asked concerning the treatment:

- How are you going to ensure that the narrative is clear? We will ensure that the narrative is clear to the audience through the use of props such as the Polaroid pictures that will show the audience that the two girls were once friends. 
- Are you going to do the whole song? The song that goes with the music video is around 8 minutes long but obviously we wouldn't want our music video to be this long and the brief would not allow it anyway. We will use the original version of the song which is around 4 minutes long. 
- What are your inspirations? 
- What costumes will the characters be wearing? Our characters will be wearing casual clothes so their costumes link with the narrative but also relate to the audience. 

- How do you plan to make sure you've tried a bunch of techniques such as playing with focus, varied angles. editing effects beyond split screen? We will most probably book the camera and equipment out before we start filming to we can get to grips with using the cameras and equipment whilst also playing around with the focus, camera angles and we will experiment with special effects after filming the footage. 

What we need to improve on:

- We need to do a recce of the park around sunset with the equipment to have a look at what the lighting and quality of the footage will look like to ensure there is no problems with lighting when it comes to production
- We also need to rent out all the equipment to play around with it and understand how to use it (during this we will also test out using the go-pro in the shower)
-  Most of our other feedback of what to improve on we have spoken about on our treatment but we didn't have time explain everything during the treatment presentation

Conclusion

This treatment feedback session was really useful in terms of giving us things to improve on so that our music video is a good as it could be. We were also able to find out more about everyone else's music video ideas. 

Thursday, 23 November 2017

Treatment

Treatment Outline

We have chosen to use the song 1-800 by Logic feat. Alessia Cara and Khalid and the genre is R&B. Our target audience is teenagers and young adults and our main characters will be two teenage girls played by Becky and Allanah. Since we have decided to produce a narrative style music video, it will be linear as we will start at the beginning of their day and follow it to the evening. It will be an illustrative narrative as there is a obvious link between the lyrics and the visuals. The main themes that will be present in the music video are: friendship, happiness, sadness and nostalgia. We will be using the original song off YouTube which before using we will attempt to contact the artist/s asking for permission to avoid copyright issues. 

Synopsis

Becky and Allanah will be playing our two main characters who are both teenage girls who live very different lives from each other. Becky's character has an unhappy home life, relationships with her parents, isn't getting good grades and has recently lost her closest friend leaving her with no one. In comparison, Allanah's character has happy home life, good relationships with her parents, good grades and a supportive group of friends. The narrative will be presented using a split screen showing a day in their lives and how different they are however, near to the end of the narrative they experience similar problems and these problems are what leads them to cross paths and become friends. A key piece of information concerning the development of the narrative is that both girls were once close friends but this will only be revealed to the audience in the middle/towards the end of the music video. 

Characters

As I mentioned previously, we have two main characters who will be played by Becky and Allanah. Other characters may include Allanah's character's friends who will probably be played by our friends Sara and Tyreke and also family members of the characters so Becky's mum will feature in the opening sequence and Allanah's. Richard dyers star theory apply's to our music video as he states that 'stars are constructed to represent "real people" and "real emotions". This relates to our music video because we made the main character with the intention of making her relatable to the audience through her emotions. 

Location

Our main filming location will be: Allanah's house, Becky's House, school, various roads and a nearby park (possibly Richmond Park). Our main aim is to film the house scenes in the daytime so we have automatic good lighting whereas we will aim to film the scenes in the park in the evening, specifically just before sunset so that it will be clear to the audience that it is towards the end of the day. For the scenes inside the houses, to be specific we will be using the bathroom for the beginning/opening scene and perhaps a bedroom for another scene. 

Visual Elements/Mise-En-Scene/Style Choices

All of our footage will be shot in colour and we aren't 100% sure what we will want the footage to look like in terms of colour - for example, for some scenes we may want the lighting to be a bit darker to reflect the mood. As we are filming the majority of the footage in the day, lighting will not be a problem, filming at sunset might be difficult so we will need to film quickly but mostly importantly experiment beforehand to see if this would work in terms of how the footage will look on camera as we still need it to be good quality. Possible props that will be involved in the music video include: Polaroid pictures, headphones which will overall contribute to the feel of the music video and make it realistic to the audience. In terms of costume, all of our actors and actresses will be wearing casual clothes like t-shirts, trainers and jeans) which will link in with the narrative. We will be using elements of performance, to show our skills and add transitions to the piece. 

Equipment and Resources

In terms of equipment and resources, we will be needing a camcorder from school along with an SD card and the charger for the camera and a tripod. We will also need our costumes which shouldn't be hard to get a hold of as they are basically our everyday clothes anyway so we will already have them. As for our props, we will need a Polaroid camera which we have access to and a pair of headphones which are easy to get as we all have a pair anyway. After getting all of our footage, we will then need Adobe Premier Pro to edit. 

Possible Struggles and how we will overcome them

A possible struggle that we could come across would be lighting in the case of filming at the park at sunset. Since it is the park, we wouldn't be able to use the lighting kit as there would be no sockets available. To overcome this issue, early on in production (as soon as possible) we will do a recce of the location and see what the footage would look like at sunset - based on our findings from doing this recce we can either go along with production assuming that there is no problem or decide to film this scene in the middle of the day so lighting isn't a problem. Another big problem that we could come across would be if the camera ran out of battery whilst we were out in the park because it would be a waste of time to go home and charge it up again - to prevent this issue we will make sure that the camera is fully charged before taking it out of the house.

Monday, 13 November 2017

Blog Update

All of the following documents for my Planning Portfolio can be found on my group's blog which I will link down below or here: ABA Group Blog
  • Song Choice
  • Lip-sync and Green Screen Task
  • Moodboard
  • Location Research
  • Costume Research
  • Treatment
  • Storyboard and Shot List
  • Production Schedule
  • Risk Assessments and Contingency Plans 

Wednesday, 8 November 2017

Target Audience Research

For my target audience research, I decided to make a set of 10 questions which I will ask people that fit into my target audience to answer, I will do this using Google forms. I chose to use a questionnaire because I think the data will be easy to gather and summarise. The purpose of this target audience research is for me to find out more information about my target audience's likes and dislikes so I can aim to create a music video that will appeal to my audience and therefore be successful. My chosen genre is R&B so the majority of my questions are related to this genre. I also decided to ask a mixture of both open and closed questions in order to gather a wide range of information about my target audience. 

Demographics and Psychographics

The target audience for our opening sequence is mostly the younger generation so teenagers and young adults of any gender. Our target audience will be Generation Y and Generation Z. According to the Socio-Economic model, our music video will appeal to Group E (students) in particular and the other groups as young adults are in many different jobs. As for psychographics, our music video will be aimed at Explorers, Strugglers and Reformers. 

Questionnaire Questions

Closed Questions
  1. How familiar are you with the genre of R&B? 
  2. How often do you listen to R&B?
  3. How old are you?
  4. How often do you watch music videos?
  5. What genre of music is your least favourite?
Open Questions
  1. If narrative, what kind of narrative would you like to see in a music video?
  2. What are you're top three favourite R&B music videos?
  3. What makes a good music video?
  4. What kinds of things do you expect to see in an R&B music video?
  5. What is your favourite style of music video and why? (Performance, Narrative, Concept, Intertextuality or In Concert/Live Performance)
Questionnaire Results

Overall, I got a total of  12 responses for both questionnaires (the one with open questions and the one with closed questions) and I decided to summarise the results using a range of pie charts and graphs to accurately present my findings and how they will influence the planning of my final product. 

Results for Open Questions 

In the case of my Open Questions, the data I collected was qualitative meaning that it would be hard to represent using pie charts or graphs so instead I will just provide screenshots of the responses from my Google Form. 

1. If narrative, what kind of narrative would you like to see in a music video? 


2. What are your top 3 favourite music videos?


3. What makes a good music video? 
4. What kinds of things do you expect to see in an R&B music video? 


5. What is your favourite style of music video and why? (Performance, Intertextuality, Narrative, Concept or In Concert/Live Performance)


Results for Closed Questions 

The data that I gathered from my closed questions was quantitative and therefore easier to summarise using pie charts and graphs. 

1. 


2.
3. 
4. 

5. 


I have concluded that from the results of my open questions, R&B is a popular genre within my target audience as 4/5 people said that was their favourite genre as it was more interesting than other styles of music video which also allows for important messages to be communicated through the video. Referring to our music video, this important message being communicated would be mental health. This is really important as we want to be producing a music video that our audience will enjoy and be interested in. When asked what they expected in an R&B music video most of my target audience said that they would expect expensive cars, celebrities and women (meaning the male gaze would be present). This was an important finding in the sense that our music video will go against the typical conventions of the genre which we hope will make our video unique and interesting to watch. Another question about audience's favourite music videos showed that most of their chosen videos were by mostly R&B artists similar to Logic meaning that our music video will be watched by our audience.  Many of our target audience also said that they would enjoy and look for a narrative music video with a thought provoking and emotional story behind it; this is really important as these are elements that we are including in our music video which ensures that it will be successful. My closed questions didn't allow for much detail in terms of answers but what I did gain from the closed questions was that it would  be correct to assume that my audience are very familiar with the genre of R&B and will like our music video and what it consists of. 

Candidate Information

Candidate Name: Abigail Baxter Candidate Number: 4129 Centre Number: 14405 Brief: A promotional package for the release of an album, to ...